Thursday, April 7, 2011

Step 5 - Escalation

Now that were on our target we need to escalate to root privileges. First step was to edit that shadow file


Now you can run John against the hash or we could just copy pirrips and overwrite the root password, which is what I did in this example


Lets see if it works

Step 4 - Penetration

We successfully logged in using pirrips private/public rsa keys. Lets take a look at the /etc/passwd file for fun


Notice that Pirrip is in a different group from magwitch and havisham. From here I was stuck for a little while. I tried unsuccessfully to download the /etc/shadow file using ssh.


So I decided to start looking around the box and see if there are any interesting directories or files. I ended up  looking at the /var/mail directory


Hmm email. Maybe theres some good stuff in there...


Hey check that out, theres pirrips password!

Step 3 - Enumeration continued

I didnt know you had to manually do this but Nikto wouldnt scan the users directories on its own, I had to manually specify this using the -r switch


Nothing too interesting right there, lets move onto the next user


Look at that! Pirrip has the .ssh directory available. Lets browse to it and see what's there.


Wow, we can download the users private and public keys. Remember our Nmap results from earlier? The server is running OpenSSH which uses RSA for cryptography. RSA uses 2 keys a public and private key. If an attacker gets a hold of your private key it is very very bad. They can assume your identity and login without needing to supply your password. Lets grab those RSA keys.

I downloaded both keys and put them in my home /.ssh directory We need to chmod the files so they have the correct permissions


Now lets try to login using pirrips keys

Step 3 - Enumeration

Now that we know there are some web servers running and other services lets see what we can find out about them.


We can use wget to download that page to our box so we can extract some of those email addresses.


Lets cut that file so we only show user id's


Great! Now we have user ID's we can test with. I also ran Nikto against this host to see what we could find out.


Nikto shows that this server might be susceptible to directory indexing. I used Dirbuster to see what I could find out.


Dirbuster didn't return anything interesting when I scanned the .100 target. But look what it showed on the .101 box


It looks like our UserID list we made earlier wasn't entirely accurate. I edited it down to only inlcude the names found in the dirbuster report - pirrip, havisham, magwitch

I tried browsing the ~pirrip directory on the web server but there were no files found

Step 2 - Scanning

Lets take a closer look at the .100 and the .101 boxes


I forgot to take a screen capture of the .101 box but it was running apache on port 80

Step 1 - Footprinting

Lets get started, the scenario just said that we are looking for boxes in the 192.168.2.X range. Lets run nmap and see what hosts pop up


As you can see we 3 hosts identified. I already know the .154 is my box so we should take a look at the .100 and the .101 boxes

De-Ice level 2

Now that I finished up the level 1 cd I decided to try the level 2 image. Heres the scenario for this one

SCENARIO 
The scenario for this LiveCD is that you have been given an assignment to test a company's 192.168.2.xxx network to identify any vulnerabilities or exploits. The systems within this network are not critical systems and recent backups have been created and tested, so any damage you might cause is of little concern. The organization has had multiple system administrators manage the network over the last couple of years, and they are unsure of the competency previous (or current) staff2 

Ill be using VMWare again to host my attacking box and the vulnerable image

Wednesday, March 30, 2011

Step 5 - Escalation; owning root

Now that we have a higher level account with aadams lets see if we can finally view the etc/shadow file


Hmm what did I do wrong? Oh, lets try to sudo first and see if that works


There it is. The password for root. Pretty clear isnt it? Wait, its encrypted. Of course. Lets take a look at the different fields in the shadow file, focusing just on root. Each field is separated by a colon :

Login name
Encrypted password
Days since Jan 1 1970 that the password was last changed
Days before password may be changed
Days after which password must be changed
Days before password is to expire that the user is warned
Days after password expires that the account is disabled
Days since Jan 1 1970 that account disabled
A reserve field

Now I copied the entire field for root and pasted it into Kate. Im sure you could download the shadow file to your attacking pc, but this was easier


Now that I have the encrypted password for root I needed a way to decrypt it. I used John for this


And there we go. We now have the root password for our target machine

Step 5 - Escalation

Now that we have a user name and password we can begin working on getting root access

The first step I took was checking out the /etc/passwd file. I wanted to see what other usernames were valid and to see what other information I could gather. Lets take a look at the file


We can see that the user accounts of aadams, bbanter and ccoffee all exist on this server. The passwd file might look a little intimidating at first but its pretty easy to break down. The first field contains the username followed by the password field. This is ually just a * as the passwords are encrypted and stored in the shadow file. The next field is a number which represents the User-ID. In our case bbanter has a UID of 1001

Next is the Group-ID. We see that bbanter and ccoffee both have a GID of 100. Notice the aadams account has a GID of 10.

After the group ID is the GECOS field which stores various user info followed by their home directory information.

 Lets try to gain access to aadams account

The first tool I used was BruteSSH


I let BruteSSH run for awhile but I was impatient so I killed the process and tried to use THC-Hydra

When I ran hydra I had a strange output saying it couldn't connect to port 22. I later found out that hydra was running too fast and I needed to add the -T switch and specify the number of login attempts to 8 at a time or less


I then ran into another issue with Hydra. It always quit before going through the entire wordlist and never found the password. After some research I found that Hydra version 5.9 was having a problem with its SSH module. I had to download version 6.1 to get it to work.

After installing and running version 6.1 hydra found the password in under 10 minutes

Step 4 - Penetration

Now that we have some usernames lets see if we can bruteforce some passwords

I dont have much practice with basic shell scripting so I decided to see if I could write a basic script that would input the usernames for me and let me put in password guesses manually. Dont laugh too hard at my first attempt


Yeah, so that one didn't work so well. Actually it didn't work at all. Heres my second attempt


This one actually worked. Sure its ugly but it did what I wanted. Once the script was running I tried using the username as the password. Surprisingly the intern (go figure) had a weak password and used his login ID as his password

Step 3 - Enumeration continued

We have already identified the host operating system, services and their version. What else can we find out about our target? We don't have any user names yet, how can we get those?

Lets see what web site is running on port 80


Wow, that page is ugly and hard to read. How else can we view it? Lets use wget to download the page locally then take a look at it


Lets take a look at that index2.php page


Hmm it looks like there are several email addresses in there. Lets try to parse them out so we can see it clearer


Great, we can see that we have emails for the system admin and other users. Lets see if we can further refine that list to just display the emails with no names or titles.


Thats looking good. Lets output the results of our cut to a new txt file for the email id's


Great, now lets cut this file and eliminate everything after the @ sign so we can get some user names


Next I opened this file with Kate and added the user names so the initial is first (example banterb I added bbanter)


Now we have some user names we can use to attempt a brute force attack on our target.

Step 3 - Enumeration

The next step in our pentest process is enumeration. During this phase we try to determine the host OS, services running and what version they are.

We already did a little bit of enumeration in my previous post using the Nmap -sV and -O options

Here are those results again


Another great tool we can use is Netcat

Lets use netcat to connect to the apache web server running on port 80

To do this we type nc -vv TARGET PORT

After we have a connection lets pull down the HTTP header to verify the apache server info

Once connected type HEAD / HTTP/1.0 then hit the return key 2x

The results confirm that this server is running Apache version 2.055

Netcat has a ton of other useful features that we will go into later

Step 2 - Scanning

Angry IP scan showed there are 3 active hosts on my network but it didn't identify who or what they are.

Before we go any further its important to document each step of your pentest. You can use any application you like, I chose to use the text editor Kate already installed on Back Track

One of the tools that you will use a lot is Nmap. Nmap is a free security scanner that can do everything from finding live hosts to operating system identification.

Lets run Nmap and see what shows up on my network


Just with a basic scan we can get some idea of whats on the network. Check out the .168 scan results. Notice that nmap showed port 139 netbios is running. This is a pretty clear indication that this target is a windows box.

Notice anything with the .100 target? Check out port 22. SSH, usually this indicates a *nix box

Lets run nmap with a -sS and -sV  -O for Syn, Version and OS detection


Woops! That didn't work. I need to be Root to run nmap with those options

Lets try again just at the .100 box since this will be my first target.


This scan shows us some  great info. We can see what version of Apache, SSH and other services are running. The scan also identified the target OS as Slax Linux

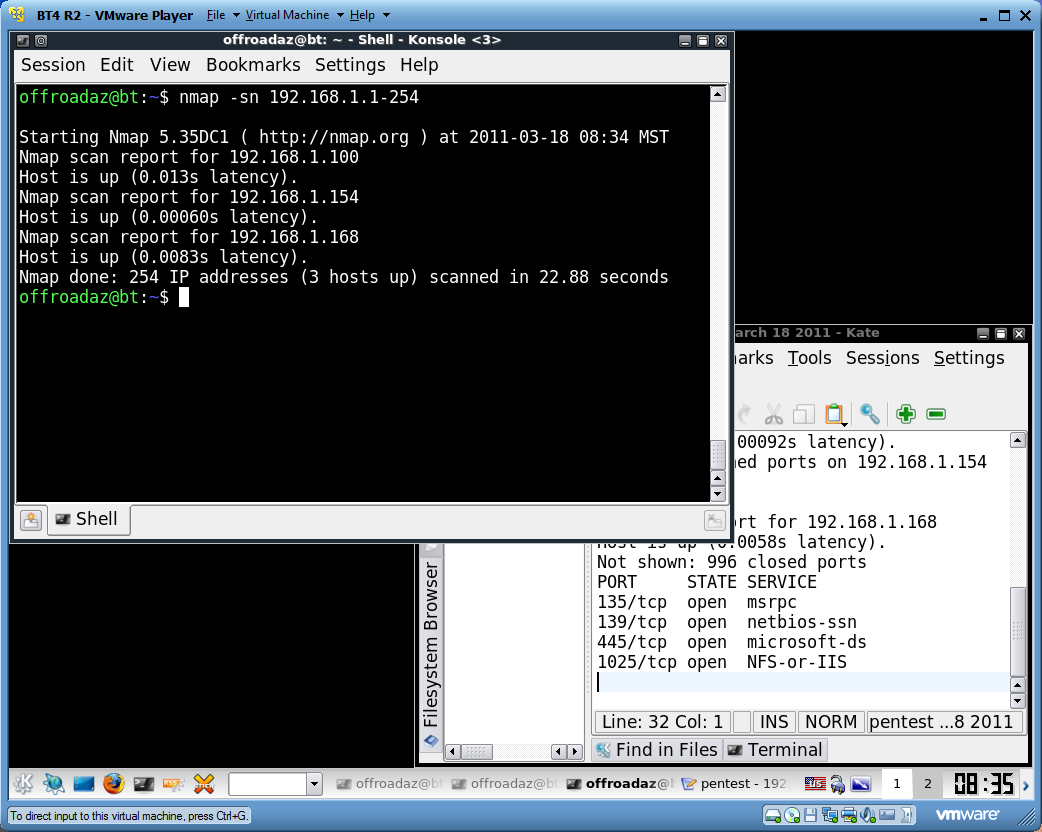
Earlier we used Angry IP Scanner to look for hosts. We can do the same thing using Nmap

Lets run Nmap with the -sn to look for hosts


The results are the same as the Angry IP Scanner. BackTrack has several tools that do basically the same thing. Its really up to you which one you want to learn,

Step 1 - Footprinting

The first step in any pentest is to gather as much information about the target(s) as possible. This can be done through DNS enumeration, visiting the companies webpage, ping sweeps and other google searches.

For my lab I didn't have any google searches, or dns entries to look at so I skipped straight ahead to looking for active hosts on the target network.

Back Track has a variety of tools that can help you identify live hosts. I used Angry IP Scanner to look for hosts.

Angry IP is pretty easy to use, just put in the network range and hit go


The results show that there are 3 hosts alive on my network. I wonder what they are?